Saturday, November 30, 2013

Modular Terrain Boards

As part of an effort to get rid of a bunch of things taking up space in the basement, I have been wanting to create a set of modular terrain boards. This would give me a lot of flexibility in setting up the table for games, as well as minimizing the storage space requirements to do so. After a few false starts over the last year or so, I have settled on a plan, and have made good progress towards accomplishing at least a solid phase 1. The end result, when complete, will be a series of one and two inch thick pieces that can be put together like a jigsaw puzzle in a variety of ways to create all sorts of different battlefields. A side benefit (but an important one) is that I have been able to dispose of several larger pieces, ranging in size from 2 by 4 feet to 4 by 6 feet.

#1 - Cutting jig (and hillside template)
For the basics I am starting with a relatively new Owens Corning product (at least to me) called "Foamboard for Projects" which is sold at the local big box home store in 2 foot square panels (1 inch thick). I was thrilled to see these in the store, since getting a four by eight foot sheet home is more of a pain, and harder to cut into smaller squares accurately. Since my gaming table is 6 by 8 feet, I decided not to use the 2 foot squares as is, since the tabletop is recessed about 3/4 of an inch down from a surrounding lip and a test fit didn't really work. I opted to make a jig out of strips of 1 by 2, which creates a 1.5 inch reveal. I use this jig to mark two cut lines on the panels and end up with a 22.5" square, since a 2" wide board is actually 1.5" wide. [See picture 1 for basic panel and my cutting jig]

To make the boards modular, anywhere hills go from board to board either on the center of an edge or on a corner need to be standard. To achieve this I have a few cardboard templates that I use to scribe the edge profiles on the sides of other pieces when building up hills. I have a "center side" template, a corner template, and a river cutout template (also to be centered on a panel). [Templates are shown in picture 2, and the use of one shown in picture 1]
#2 - Cutting templates and planning tiles

Panels can be anything you desire, simple or fancy, as long as they have standard joins on the sides to make them compatible with other boards. Strictly speaking, this isn't even true, as some of the boards in the collection can be non-modular but therefore only usable in certain ways. Standard size building blocks can also be combined into larger pieces (for example, 22.5" by 45", or 22.5" by 67.5"), although as you make larger pieces you create the storage issue I was trying to minimize. In addition to the standard pieces I have made thus far I am working on a "2 block" high hill and a "3 block" river section, using layers of poured Envirotex as the water. Picture #3 shows a basic panel as bought and a finished panel with a simple hill using a center edge join.
#3 - 2' by 2' pink board and finished product

To date I have completed ten pieces, which can be seen in picture #4 stacked in the rack I built (with their end profiles showing to see how they join). Picture 2 also shows some little template pictures I made so that I can play around with table configurations in small scale rather than pulling out all the life sized pieces and moving them around. Each piece is numbered to its matching card. Once I decide on what I want my table to look like for a game, all I have to do is see which tiles I used and pull only what I need out of the rack.
#4 - Edge profiles, and numbered

I will take a picture soon using some of the tiles I have made.

Monday, November 25, 2013

A Storage Project

Built
I have been slowly working on a set of modular terrain tiles over the course of the past several months. In the interests of minimizing the amount of storage space needed compared to the pile of big terrain boards (4 by 6 feet) that have accumulated in the unfinished part of the basement, I figured that a nice set of modular tiles would give me a lot of flexibility and allow me to discard a bunch of big rarely used boards. The purging part has been completed, and the first 10 terrain tiles are complete (I'll do a separate post soon on those).

Something that became apparent to me as this stack of tiles was accumulating was that I needed a good storage solution for them, or they would end up jumbled in a pile much like the previous stack of stuff leaning against the wall. While watching a cooking show on the Food Network with Grace it occurred to me that what I needed was a customized version of a baker's rack. So this weekend, I built one.

My terrain tiles are 22.5 inches square, so the interior needed to be an opening of approximately 2 feet. To give some wiggle room, it is 26 inches wide and 24 inches deep. It is a simple frame made of pine boards, with pairs of "shelf" braces every vertical 12 inches or so. Due to the lightweight nature of the foam boards, the framing can be pretty basic, and you don't need true shelves, just slats front and back to rest the boards on. I offset the slats from the front and back so the tiles sit comfortably on them, and installed a vertical "stop" in the center of the back so that the tiles simply slide in on the shelves until they hit the riser in the back (so they don't keep right on going and fall out the other side). It is braced properly so it won't fall apart.
Loaded

The whole assembly is six feet tall and will hold somewhere in the neighborhood of 20-24 tiles, assuming that some will be thicker than others. I mounted the unit on small caster wheels so I can move it around as needed. The finished product can be seen with my tiles in it. Each shelf will hold 3-5 tiles. I have put scraps of green fleece between each tile to cut down on friction, so that the flocking doesn't rub off as easily.
Current state of the gaming area

The seemingly never ending quest to reorganize is finally starting to feel like the end, for the moment, is in sight. I have purged a lot of things, sold some on eBay, sold some at the convention last week, and have spent a lot of time making sure I am using the available space as effectively as I can. I'm sure I will never really be done, but for right now, my gaming area no longer looks like a tornado hit it. So that's a good thing.

Sunday, November 17, 2013

Fall In 2013

The Fall In convention was held at the Lancaster Host in Lancaster PA this weekend (11/15-11/17), and as usual I went for the day on both Friday and Saturday.

The convention seemed well attended (the weather was good; no snow this year). I did my usual, which is to say wander around and watch as many different things as I could without actually playing in anything. I ran into Leo a bunch of times, as well as lots of other gaming friends and acquaintances. I did leave early enough Friday afternoon to see the Garnet Valley playoff game against Abington (see separate post).

Purchases were modest (sort of...maybe not):
  • General de Brigade Napoleonic rules. Still in search of the perfect Nappy rules, and this seems to get played quite a bit in other peoples' blogs.
  • Impetus expansion magazine Extra Impetus #5. Most of the content in this issue is the feudal period.
  • Three 15mm scale ruined building pieces from Old Glory for use in WW2 gaming. These are nice pieces that will be a breeze to paint up.
  • Ten beautiful 25mm scale flags for my medievals from the Flag Dude. These were an assortment of Ottoman, Hundred Years War, and a few suitably generic looking Wars of the Roses pieces.
  • A bunch of pre-cut bases from Gale Force 9.
  • Two more Flames of War 15mm houses to go with the five I already have. As noted on the blog before, a decent sized table for 15mm WW2 gobbles up lots of terrain, and I don't have enough buildings for this period and scale.
  • A book at the flea market: Wellington Invades France; The Final Phase of the Peninsular War 1813-1814, by Ian Robertson. I have liked this denouement phase of the war ever since doing research for my Orthez game.
Primed ruined buildings and some flags
OK, so perhaps my purchases weren't all that modest, but I did more than make up for it. I had signed up for a flea market table on Saturday from 10am to 1pm, and took a bunch of things I had not used in years, and might likely never use again. Over the course of two hours I sold almost everything I brought and pocketed $640. Not bad for a couple hours work (by noon I was substantially out of things to sell). I sold my collection of fighting sail era ships, all of my French and Indian war Brits and native Americans, any Warhammer 40k science fiction stuff I had accumulated over the years, a little bit of Bolt Action stuff I had bought on a whim but changed my mind on (including the rules), and various old books and rules.

After finishing the flea market, I spent a few more hours wandering and watching various games and then headed home with my head full of inspiration for new projects and expansions to old projects.

It occurred to me after the fact that despite taking a point and shoot camera and having my phone as well, I didn't take a single picture. Oops. Next time...

Saturday, November 16, 2013

All Good Things Must End

Abington 26, Garnet Valley 21
Garnet Valley's football season ended last night in the second round of the division AAAA playoffs, losing 26-21 to Abington. The game was there for the taking, with the good guys leading 21-13 at halftime. Unfortunately, we couldn't put any points on the board in the second half, and despite leading for 47.5 out of 48 minutes of game time, we were behind at the only point that mattered - the end. With two and a half minutes to go, GV's defense was unable to hold Abington from marching down the field and scoring the go ahead touchdown on a moderately long pass into the far corner of the end zone with 25 seconds to go.

It was a good close game, and the girls were happy to stay for the whole thing. The team had a great season and gave us many Friday evenings of fun. I hope they are anywhere near this good again next year. One way or another, I am sure we will be there watching the band and cheering on the team. Thanks Jaguars!

Monday, November 11, 2013

Impetus Campaign - Beren Roadblock

Henry de Cheraute's detachment is on the road to Beren with a little pillaging in mind when they find the road ahead blocked by a small force of enemy infantry...

Turn 1 (Henry advances...)
Friendly - All units move ahead two moves, only the left flank light infantry under Larcevaux disorder as they enter the woods.
Enemy - All units are on opportunity. The crossbows elect to fire on Boncarre's skirmishers, rolling one damage that luckily only causes disorder (skirmishers are very fragile with a low VBU and thus a low critical number - one damage and one bad cohesion test and they can vanish in an instant).
End of Turn 1

Turn 2 (...and advances some more...)
Enemy - The crossbows fire again, missing. No other actions.
Friendly - Larcevaux's light infantry fail to rally and move ahead into the woods. Pominville's heavy infantry move twice along the road (but not on it) and disorder. Boncarre's skirmishers rally, move ahead once, fire their javelins at point blank range at the crossbows...and miss. Oops. Morenz's light infantry move up behind the skirmisher screen. Wilkinson's crossbows move forward once and shoot at the heavy infantry directly to their front and cause one damage, but this only disorders the target. Cadogan's little band of Scottish pike men move forward along the road then form up, ending in disorder.
End of Turn 2

Turn 3 (The enemy gets aggressive)
Friendly - Boncarre's javelinmen breathe a sigh of relief at the double move (two friendly turns in a row; lost initiative last turn, won it this turn) and shoot at the crossbows, disordering them. Wilkinson's crossbows hold their ground and shoot at the disordered heavy infantry, failing to hit them. Pominville and Cadogan both fail to rally and move once forward. Larcevaux's men in the trees rally and move once forward, clearing the edge of the woods. Thomas' mounted men at arms wheel toward the open flank and move forward, disordering.
Enemy - At the start of the enemy turn, I roll a d6. On a roll of 6, some number of enemy units will appear, but the roll fails. I step back and survey the field, noting that I have pushed Henry's lighter units forward in advance of the heavier troops, leaving them somewhat exposed. I decide to randomize the enemy reaction, and on a d6 scale of 1 being very cautious through 6 being very aggressive, roll a 6. Aggressive it is, then. I decide the most logical course of action would be to attack with the enemy right and center, and refuse the left flank unit against the advancing knights. The left flank heavy infantry moves once to the rear, disordering. The crossbows rally, shoot at the skirmishers at point blank range and miss again. On the enemy far right (left of the picture), a unit of levy heavy infantry charge forward into Larcevaux's light infantry, disordering themselves as they charge far enough to make contact. In the ensuing fight, no casualties are inflicted and the units will remain disordered and locked in melee. Next, the enemy commander urges his own unit of heavy spearmen forward, wheeling once and charging Morenz's light infantry behind their skirmisher screen. Boncarre's javelinmen, seeing the enemy heavy infantry charging in from off to their side, toss one last round of javelins ineffectively before dispersing and fleeing the field. [A review of the Evading rules when this situation arose showed that a skirmisher unit being charged by a unit that began entirely outside of its frontal projection does not permit an Evade move...live and learn]. The enemy unit continued its charge through the fleeing skirmishers and into Morenz's unit in good order. Both units cause damage but only manage to disorder each other; they also remain locked in melee.
End of Turn 3

Turn 4 (The enemy waver...)
Enemy - The enemy win the initiative, so now they get a "double move". Another reinforcement roll fails. The melee between the levies and Larcevaux's men goes another round, causing a loss on the levies and forcing them to retreat 3 inches. The enemy commander's men fighting against Morenz's light infantry are not as lucky. In a ferocious and bloody melee, 2 losses are inflicted on Morenz, but the enemy suffers 3 losses in return. Morenz suffers a minor leg wound, but the enemy commander is swarmed upon as his unit retreats and is killed. Amidst the carnage to their right, the crossbows fired on Thomas' knights and inflicted a loss.
Friendly - Larcevaux's men fail to rally but charge the retreating levies to their front. They cause one damage, and yet another "6" on the cohesion test has the levy unit rout. Morenz, apparently distracted by his wound, fails to rally and holds position. Wilkinson's crossbows target their counterparts and cause one damage. The cohesion test results in the third "6" in a row, and the enemy crossbows rout. Seeing the combat in front of them, Pominville's heavy infantry rally and move ahead, as do Cadogan's Scots. The knights fail to rally but wheel to face the remaining fresh infantry unit.
End of Turn 4

Turn 5 (...and then crumble)
Friendly - Morenz's light infantry fail to rally, but move to the rear, interpenetrating Pominville's fresh troops as they go. Pominville rallies off the resulting disorder and charges the remnants of the enemy commander's unit. In the ensuing combat, the enemy unit takes its final loss and routs from the field, effectively ending any organized resistance.
Enemy - There is nothing left for the enemy but for the survivors to flee the field of battle as best they can, as only one unit remains.
End of Turn 5 / Game

Game recap and a few more thoughts on Impetus
This was a short little game that ended very quickly once the forces became engaged. An untimely string of three "6's" in a row on enemy cohesion tests effectively vaporized the enemy battle line in a matter of moments. Without those bad die rolls, this could have been a very different game (or certainly a longer one!).

These little games continue to serve their purpose for me. I am becoming more and more comfortable with the core rules and can focus more on learning the implications of the various charts and rules and their effect on game play. I still haven't come across anything that I really dislike. There are a few things that I still need to get used to, and formulate an opinion on. One is the fact that a poor cohesion test die roll can make a lesser unit disappear instantaneously; one moment fresh and perfectly fine, the next moment gone. The other is the lack of any morale rules. Nothing effects a unit, despite whatever may be going on around it, until the whole command reaches its break point and picks up and disappears. I suppose this works fine for a fairly simplistic game.

One possible criticism I would have is a similar one that I would have with many other miniatures game rules, and that is the draconian adherence to unit facing with regards to movement and charging. In truly linear periods such as the Seven Years War or the Marlburian period, this makes sense. I would argue that in much of the medieval period, where "units" as we would consider them would be more along the lines of "a bunch of guys", things shouldn't need to be quite so rigid. We need structure in the rules, I understand that. But I find that the result of the "thou shalt move very rigidly and in geometric precision only" rules tend to result in tabletop occurrences that often defy common sense. Movement often devolves into a weird stylized version of chess. I do not like the commandments of "thou shalt not deviate from a straight forward move." Or "thou shalt not wheel while moving." Or "thou shall only be permitted to wheel if it is the very first thing you shall do during your move." Why? If movement is a function of time spent and ground covered, why can't I wheel during my move and not only at the beginning (or the end), or as an entirely separate movement action? This is why I find games like Armati to be an unplayable exercise in ridiculousness. Which isn't to say that Impetus movement rules are any worse than most, they just trigger a personal pet peeve of mine, that's all.

All that being said, there is an aspect of the movement rules for Impetus that I really do like, and that is the opportunity to have multiple moves, discipline tests permitting, and with the risk that pushing your men too hard will result in disorder, leaving them vulnerable to the enemy. This creates good decision making points in the game, and adds a lot of uncertainty. This is good stuff.

Campaign - Henry's easy defeat of the enemy force allows him to plunder Beren, pillaging the village and burning crops, mills and property. No substantial losses were inflicted on Henry's forces, although Morenz's light infantry took a couple losses, so I will put a note next to them (maybe next time they get a discipline penalty or something).

Next...I need a scenario #3...

Saturday, November 9, 2013

Go Jaguars!

Garnet Valley High School football
We have been having a lot of fun the last couple of years attending the Garnet Valley high school football games. We started going semi-regularly when Julia was in 7th and 8th grades because her friends were going and she wanted to be a part of things. Grace grudgingly went along, and wasn't all that interested, but then realized that some of her friends were going with their families too, and then it became OK. It helps that the team has been good (as has been the marching band).

Julia's Spirit squad w/GVHS Cheerleaders, 11/1/13
This year, Julia is in high school, and some of her friends are in the band, or are cheerleaders, and she wants to go all the time. I think we made every home game this year except one. In addition to bringing back good memories of my own, it has been a lot of fun this year. The team has been fantastic, going 9-0 and winning the Central League, and going 10-0 overall. We are the number one seed in the District playoffs. GV scored a total of 381 points and allowed only 102, making the average game score 38-10. Most of the games have been substantially over by half time, and some of them by the end of the 1st quarter. We typically see the first half and then stay to watch the marching bands' halftime shows, and then leave (the games generally being about 30-0 or 30-7 at this point). Also, once a year, Julia's Spirit squad of cheerleaders gets to stand on the sidelines with the high school cheerleaders for a half and participate; Julia always loves that.

November 8, 2013 - Garnet Valley 35, Council Rock North 21
Last night in the 40 degree chill, we hosted the #16 seed, Council Rock North. CR started with the ball and moved it on us pretty well (which is rare) but didn't score. It was 7-0 good guys by the end of the quarter, and 14-0 a couple minutes into the second quarter. Our offense was good early but then got sluggish. It was 21-0 in the 3rd quarter when we gave up a 97 yard TD drive keyed by a lot of 7-8 yard short passes and a bunch of uncharacteristically dumb penalties by our defense. We didn't score in response, and then gave up an 80 yard TD run to the opposing QB. Suddenly it was 21-14 and we were back on our heels near the end of the 3rd quarter. The group of us sitting together wondered how the team would respond to the adversity, not having been challenged much late in games all year. At this point I have to admit that the kids were freezing despite being bundled up, and wanted to go home, which we did. I hated leaving early this time as it was a very good game, and the outcome was still in doubt. The rest of the results came by text message from our friends who stayed. Early in the 4th, as we were leaving, we had gotten the ball back and were starting to drive. We scored soon after to make it 28-14, then again to go up 35-14 effectively putting the game away. With only a few minutes left in the game, CR scored once more to get to the final of 35-21, but the game was out of reach by that point. We ended up scoring around our usual number of points, but gave up way more than normal, and the game was closer later than had happened all year. Our first string offense (missing a key running back) struggled moving the ball consistently in the middle part of the game; they are generally a juggernaut (before getting pulled for the second half). But all's well that ends well, and it is the playoffs after all...

Next week, Garnet Valley vs Abington, details TBD.

Thursday, November 7, 2013

Refurbishing Crossbows

One of the units I pulled out of the box to use in the next game was a 12 figure, 4 stand unit of crossbowmen. These are "12th Century Crossbows" by Old Glory, and while that is an earlier period than my Hundred Years War scenario, these figures are generic enough in look to fit nicely throughout the early and mid medieval period.
Before...

This unit also happens to be another one of those older units that was painted for me perhaps ten years ago, and I would no longer consider up to standard. Before putting them on the table, I took some time to brighten them up. I touched up some highlighting on the armor, lightened up the color of the wooden crossbows, added a little color to some of the exposed clothing bits, and cleaned up the flesh.
...and After

The before and after pictures don't do justice to the difference, which is much more pronounced in real life. As some of these old units cross my table, it helps to brighten them up without a major repainting effort (if I wanted to do that, I would buy a new pack of figures and start from scratch).

Maybe I'll even put these guys on Impetus style bases. Wait...no...no...no...

Wednesday, November 6, 2013

Hundred Years War Javelinmen

Skirmish bases with javelins
I have sworn I will not undertake a substantial re-basing effort because of the appeal of Impetus style bases, but...

A common troop type that appears in all of the various HYW Impetus lists are skirmishers with javelins. I have lots of skirmish stands with bows and crossbows (two figs to a stand on a 60mm by 25mm stand), but none with javelins. In order to have some available for my campaign, I pulled apart a pair each of three-figure stands of Breton bidets and Spanish light infantry and then mixed and remounted the figures two to a base on deeper stands. Voila - 3 units of skirmishers with javelins.


Tuesday, November 5, 2013

Impetus Campaign - Henry's Choice

Henry surveys the field
Henry de Cheraute, advancing in a northeasterly direction to the north (left) of Raymond's main body with a predominantly infantry contingent, was sent to "investigate" the village of Beren. As his troops trudged along the muddy road to town, Gauthier de Morenz, commanding the light infantry advance guard, reported back that an enemy force was drawn up near a crossroads beyond the next ridge. Henry, riding with his men at arms under his younger brother Thomas, crested the ridge and surveyed the scene before him.

Ahead, beyond a small clump of trees, was a fork in the road. The left fork, curving to the north, led to Beren. The right fork continued east in the direction of Henry's next rendezvous with Raymond, where he was due by nightfall tomorrow. Centered on high ground to the north of the road fork was an enemy force that appeared smaller than his own. He did not see any cavalry, but his visibility was hindered by the trees and the high ground.

Thomas studied the scene for a few more moments as their foot soldiers clanked up the road behind them. Finally he spoke. "Well, brother, what's it to be? We could double back the way we came. Or force our way down the east road. Or fight."

Henry smiled and replied "My orders were to pay a visit to the good citizens of Beren. Let's go test these gentlemens' resolve..."
The (visible) enemy

Scenario #2
Through a bit of random selection, our second scenario will be a small fight between two primarily infantry forces. After laying out the basics of the situation I randomized whether Henry should behave aggressively (fight), moderately (bypass and head east) or cautiously (retreat). On a 1-10 scale, I rolled the low end of aggressive, so Henry's plan will be to attack, but prudently. If things do not go well, he will look to disengage and head east.

Henry's forces (with their newly named "captains"):
  • Commander Henry de Cheraute (Fair quality)
  • Mounted men at arms (Thomas de Cheraute)
  • Provincial heavy infantry [FP] (Richard Pominville)
  • Provincial light infantry, long spears [FL] (Gauthier de Morenz)
  • Provincial light infantry long spears [FL] (Emile Larcevaux)
  • Crossbowmen, class B [T] (Edmund Wilkinson)
  • Javelinmen [S] (Phillippe Boncarre)
  • Scottish mercenary pikemen [FP] (Robert Cadogan)

The defenders of Beren:
  • One leader whose rating will be randomized the first time we need to use it for something substantial
  • Two units of heavy infantry [FP] with long spears
  • One unit of crossbowmen [T] (class B)
  • One unit of town militia [FP]
In addition to these named forces, beginning around the time the troops become engaged, I will begin to randomly test for enemy hidden forces or reinforcements (size and type TBD if they appear). Henry might get a surprise of some sort...

...to be Continued

Impetus Campaign - What's In a Name?

Grace has been showing interest in the Impetus game I played recently (as she does with many of the games I set up, and figures I paint). When I was explaining the idea of a campaign to her, as a series of linked battles, she looked at the leader figures on the table and asked me "do they have names?" I said they didn't. She thought they should.

So we are coming up with a bunch of French-ish and English-ish names so that we can have a named "captain" in charge of each unit on Raymond's overall roster, not just the three generals. This is actually a good idea - it will make the characters of our little drama seem more real, and make for more interesting battle report write ups, especially in the sense of continuity from one to the next. It will also mean I throw together a few simple rules on these "captains"; losses inflicted on units during the course of a battle should have some chance of wounding, killing or capturing our named guy, much the same way in which attached commanders can be effected in the normal rules. These "captains" will have no impact on the game other than to provide color. At least that's the plan at this point, but who knows...

When I have concocted enough names, I will go back and edit the first battle report. We will have, for instance, references to "Giacomo Penneti's crossbowmen" instead of "the Italian mercenary crossbow unit."

I think I like the idea. Yay, Grace!

Monday, November 4, 2013

Impetus Rules - First Thoughts

Having played a single solo game of Impetus, after having read the rules several times in fits and starts over the last couple of years, I might as well post my first impressions. I do so with the caveat that there were lots of pieces of the rules that were irrelevant to my little medieval battle and therefore got skipped over entirely (pike and shot type considerations, pila for Romans, elephants, chariots, artillery, large units, wagonburgs, etc).

First and foremost, it was a fun and straightforward playing game. Even with my lack of experience with the rules, I didn't spend too much time flipping through the book trying to find a rule. When I did, I didn't have too much difficulty finding what I was looking for. I jotted down a short list of questions that I will seek clarification on. Nothing that occurred during the game had me mumbling "well that's silly", which is always good for a first impression.

Some specific random thoughts:
  • Differences in missile troops types, even within the same weapon type, can be substantial and will take some getting used to. In my game, the mercenary crossbows (class A) on my side had a long range of 30U. The French crossbows on the other side (class B) only have a short range out to 15U and cannot shoot at long range. That means the mercenaries can sit anywhere in the 16"-30" range band and shoot at their leisure with no ability to be shot at in return. Hmm.
  • I liked the ability to take multiple movement phases with a unit as long as you are willing to risk the disorder. This made for some interesting choices throughout the game.
  • The relationship of "damage" to actual "losses" via the Cohesion Test is subtle but effective. High VBU units like men at arms, heavy cavalry and some of the better infantry are pretty stout. As these units wear down (and all lesser VBU units from the start) they become very fragile, often only taking one damage and routing from the resulting failed cohesion test. Experience will give me a better feel for this, but it seemed reasonable.
  • A command structure rated "poor" is really ineffective, and pretty much requires that you attach your leaders to units, making them vulnerable to the effects of combat. A command span of 10U (inches) from the board edge is useless.
  • Low current VBU units locked in melee seem like they could be stuck there for quite a while waiting for one side or the other to roll the "6" they need on one or two dice. Just an observation...
And I did have a few questions:
  • Can Rally be attempted by a Disordered unit stuck in an ongoing melee when it first activates, before fighting the next round of combat? Nothing in Rally or Melee says you can't, but it doesn't seem like this should be possible. I played that you cannot. [Later addition...it says in Disorder near the beginning of the rules that units in Melee cannot attempt to Rally.]
  • Is there a limit to the number of "retreat/pursue/catch/immediate refight" cycles that can happen in one activation? In my first cavalry clash, this situation came up. The Melee rules don't say either way. I played that one retreat/pursuit/refight cycle, and then a continuing melee carrying over into the next activation/turn.
  • For units locked in an ongoing melee, if another round of combat is fought and nobody causes damage (nothing happens), is there any resulting effect at all? I couldn't find a reference to anything, but it seemed like maybe each side would pick up an additional Disorder (turning into a loss if already disordered). If nothing happens, then (as per my comment above) it seems like units could sit locked in melee for quite a while.
I guess I should set up a user ID on the Impetus website forum and post my questions, or go trolling for answers in the multitude of old posts that are already out there (I wonder how good that forum's search capability is???).

Sunday, November 3, 2013

Hundred Years War - Next Steps

As I played my way through my first Impetus game, a bunch of thoughts were going through my head as to what I needed (or wanted) to do next with the Hundred Years War part of my collection.
  • I am torn about basing. I love the look of Impetus style bases vs old-style smaller bases. The freedom to make each base a small diorama, and to have the figures less "regular" in their appearance is appealing. Mounting 25mm infantry on a 60mm wide and 25mm or so deep stand makes everyone end up looking very strictly ranked. Mounting the same figures (and perhaps less figures per unit in total) on a deeper base allows for unit types that should look regular to still be ranked nicely, but to have unit types that should look more irregular be staggered on the bases. The standard 25mm figure unit base is 120mm wide. For those few units I have based this way, I have still based each unit in a pair of 60mm wide bases. This allows for a "column" type of formation (which Impetus doesn't really have but should) as well as using the figures for other games such as Medieval Warfare. I think what I am going to do going forward is to rebase just a few units in this manner, but to do more like this as I add more new units. [As an aside, the current version of Day of Battle uses Impetus style bases.]
  • I have lots of figure bases in this period that were mounted after coming back from being painted in Sri Lanka but the bases were never finished. It pains my finicky nature to play with figures glued to plain green-painted bases, but I also hate finishing the bases. Base finishing is one of my least favorite things. But...time to suck it up and properly finish any units I use in this campaign.
  • I could use more mounted men at arms (knights). I have figure stock on hand for another half dozen or so units. I should work on them (yes, I know, add them to the list...with the Ottomans...etc).
  • I still need better lighting for picture taking in the gaming area. I have a great camera but you'd never know it from the poorly and unevenly lit pictures.
  • A few of my oldest "generic medievals" that I had painted by a guy in Ohio 10 or 12 years ago are not up to standard and could use some touching up. As with the base finishing, any unit that gets used in this campaign goes into the "needs work" area of the painting table for touch up before it can be used again.
  • I need to buy a bunch of 60mm wide by 50 or 60mm deep bases from Litko or Gale Force 9 at the FALL IN convention in a couple weeks.
So much to do...

Saturday, November 2, 2013

Impetus Campaign - Cazalet Finale

Second and final part of the skirmish at Cazalet
Turn 6
Friendly - Longbows rally, shoot with 3 dice at the heavy infantry and miss. The mercenary crossbows rally, fire 4 dice at short range, score 2 damage resulting in 3 losses and rout/destroy the enemy crossbows on the hill. The remainder of William's forces work on forming some sort of battleline with the heavy cavalry and the heavy infantry billmen ending disordered. William and his knights edge forward.
Enemy - The heavy infantry fails to rally, and the two levy infantry units inch forward to stay hidden behind the hill.
End of turn 6

Turn 7
Enemy - Heavy infantry rallies. The enemy hold their ground.
Friendly - A battle line is formed, more or less, but the heavy cavalry, billmen, longbows and mercenary crossbows all end in disorder primarily because of the necessary obliqueing and sidestepping.
(I forgot to take a picture).

Turn 8
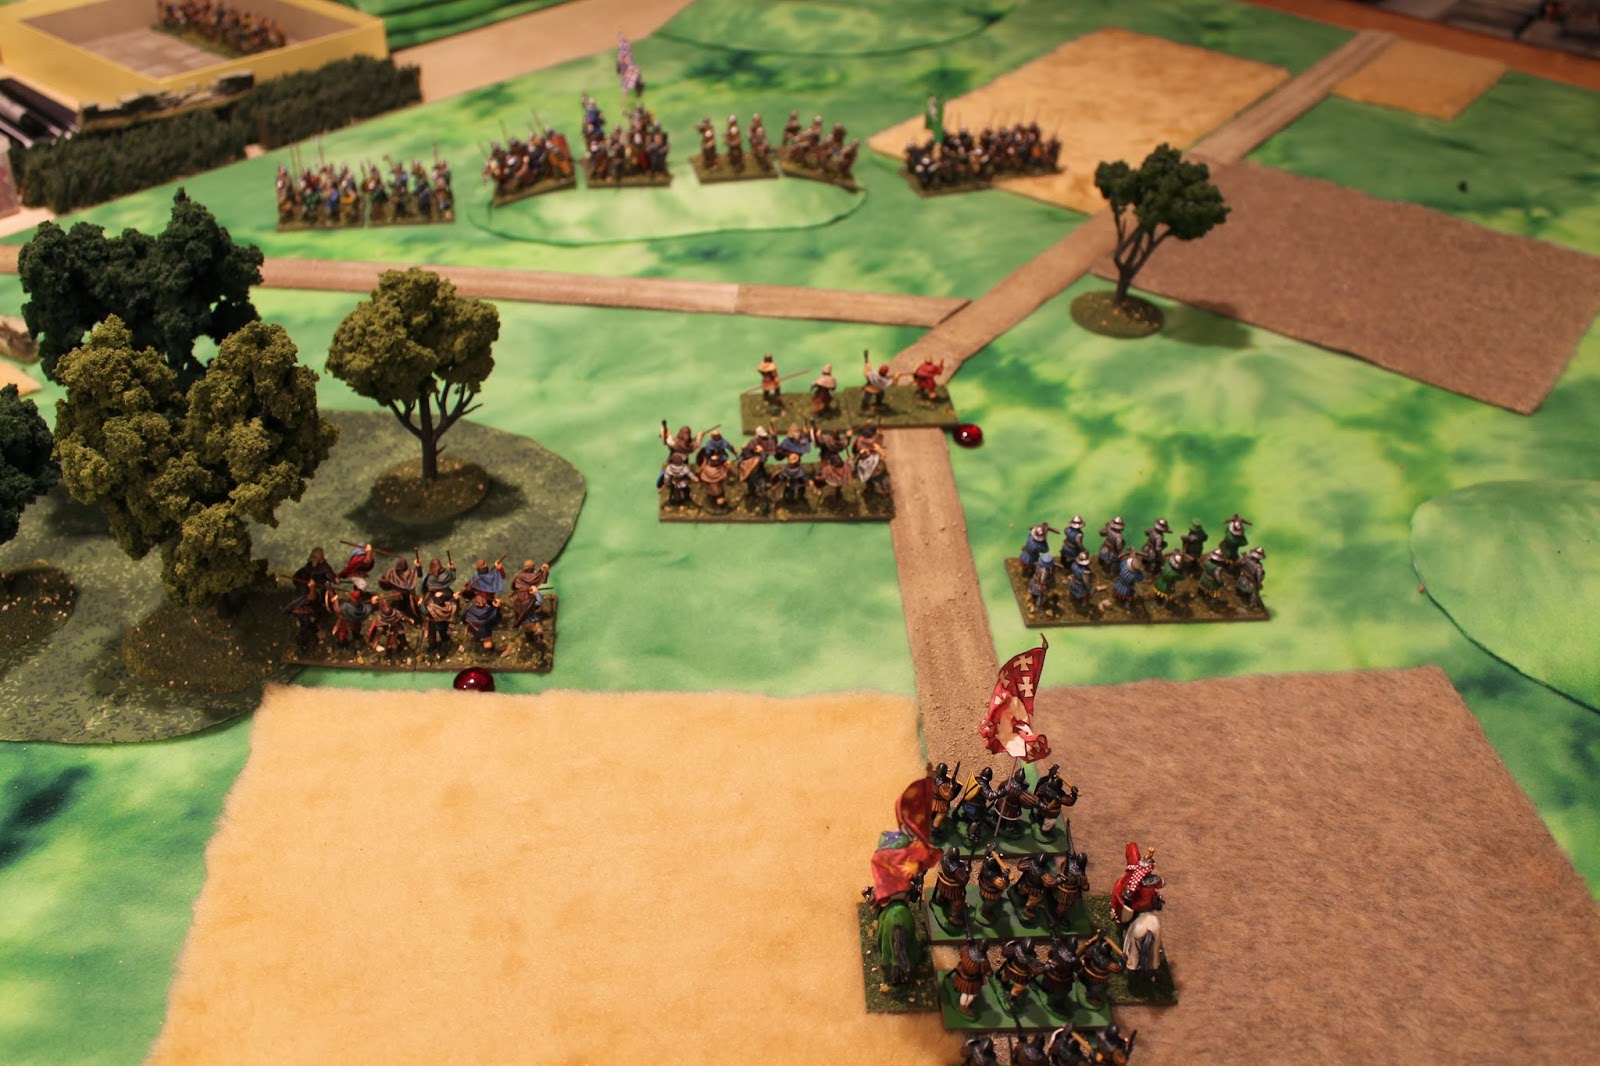
Enemy - One of the levy units charges into the billmen, who are advancing up the gentle slope to their front. The enemy wants to deny the hilltop to the billmen, and also take the opportunity to get an impetus bonus on their charge. The levies roll 4 dice (VBU 3 plus 1 impetus), score 3 damage, and inflict 2 losses. The billmen roll 4 dice also (VBU 5 minus 1 disorder), score 1 damage, but also inflict 2 losses. As this is a tie, both units remain locked in melee. The levies become disordered (the billmen already are, and since they took losses I didn't give them another for disorder on top of already disordered - I think I did this correctly...). 
Friendly - Mercenary crossbows fail to rally, move once forward and declare a point blank shot at the levy unit in front of them. Since this shot is likely to be very effective, the levy chooses to reaction charge the crossbows (they can do this as the crossbows have entered their 5 inch forward zone of influence and are shooting at them). My interpretation was that this charge happens in lieu of the shooting as the opportunity/reaction takes precedent over the triggering event (the declared shot), and this is point blank range where the missile unit is not a class A longbow. I believe a class A longbow would have been able to shoot as the levy charged in. The crossbows rolled well, causing 1 damage resulting in 2 losses for the levies, who failed to hit in return. The levies retreat 2 inches and end disordered.
The billmen activate next and fight their continuing melee against the other levies. No result is achieved and they remain locked in melee. As both units have 2 losses and are disordered, they roll very few dice and therefore it is hard to hit the opponent (billmen have current VBU 3 minus disorder for 2 dice, and the levies have current VBU 1 minus disorder for zero dice, and roll the minimum 1 die). The way I am reading the rules, there does not seem to be a minimum effect of a round of combat, so nothing happens.
The longbows shoot and disorder the heavy infantry behind the hedge. The mounted troops wait patiently.

End of turn 8

Turn 9
Friendly - The mercenary crossbows fail to rally, but still shoot 7 dice at the damaged levies in front of them (VBU 4 plus 4 bonus point blank vs infantry for class A crossbows minus 1 disorder). Only 1 damage is caused but the cohesion test for the levies goes poorly and they lose their last loss and rout. The billmen fight another inconclusive round of their melee with the other levies. The longbows shoot at the heavy infantry again, cause 1 damage, which due to more poor French cohesion die rolling turns into 2 losses. The light infantry move forward, the heavy cavalry remains disordered and William bides his time...
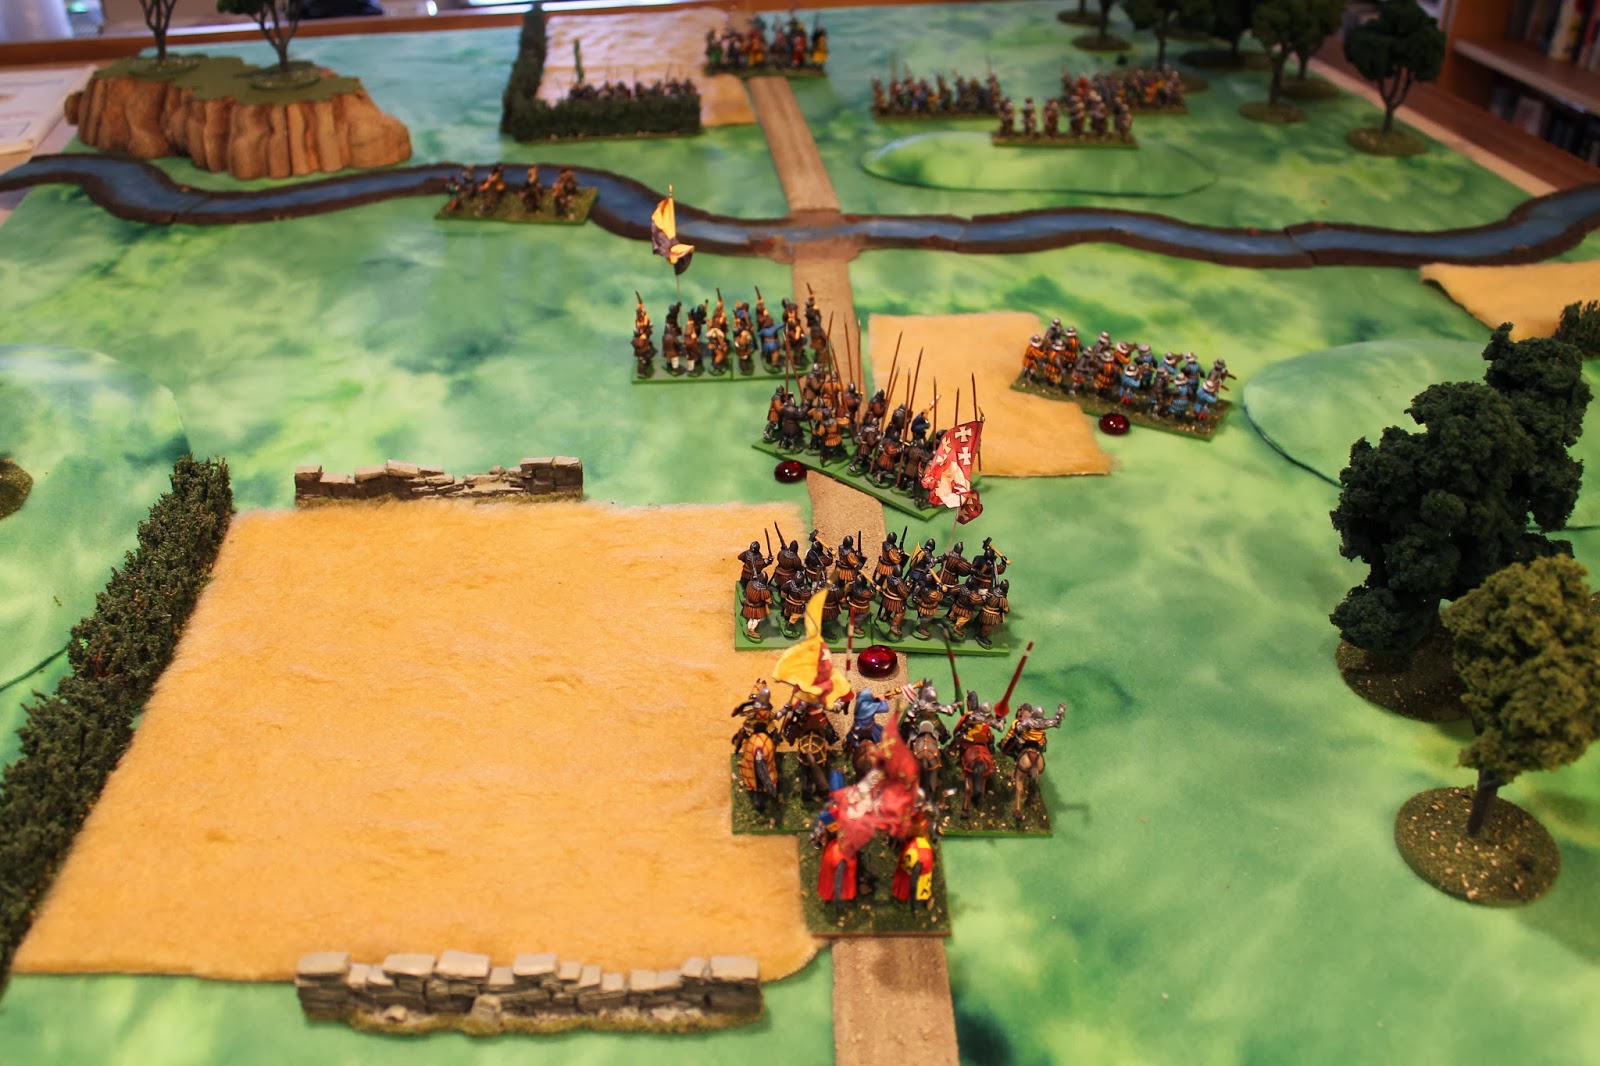
The Men at Arms clash in turn 9
Enemy - The constable sees the situation slipping away from him, and pride dictates (randomly) that he take matters into his own hands. He grabs his banner and spurs his men at arms forward down the road, aiming directly for William's banner. William, being charged in the front but not being on opportunity must pass a discipline check to countercharge, which he passes. He spurs his knights forward and they crash into the constable's oncoming men. Each side rolls 11 dice (VBU 7 plus fresh first round impetus bonus of 4). Both sides roll poorly, inflicting only a damage or two, and no losses to either side result. Both units become disordered and locked in melee. Neither attached leader is required to check for casualties as neither cohesion test rolled a "6".
End of turn 9
At the end of turn 9 we have two ongoing melees. The situation for the French blocking force is dire; the heavy infantry are being shot up with no real option but to stand and take it, and the brave levies are having a tough time with the better quality (and more numerous) opposition.

Turn 10
Friendly - The mercenary crossbowmen rally, move, wheel, and end in disorder. Still, they are able to shoot with 1 die across the field into the flank of the heavy infantry sheltering behind the hedge, but do no damage. The billmen fight another round of their ongoing melee and take a loss (their third out of 5) and retreat 2 inches back down the slope from the valiant levies. The longbows then target the heavy infantry, causing 2 damage and 2 losses, which sends them routing from the field.
The swirling clash of mounted men at arms continues. Each unit rolls 6 dice this time instead of 11 (VBU 7 and disordered). The constable's men take a loss and retreat 3 inches. William's knight roll for pursuit and catch the retreating French, precipitating another immediate round of combat. In this round, William's men take one loss and retreat from the fight. I am not sure according to the rules whether these retreat/pursuit cycles continue indefinitely or not, but I chose to not allow a second pursuit beyond the one already conducted in this phase. Lastly, the skirmishers fire into the flank of the French knights and surprisingly cause a loss.
During turn 10

Enemy - The constable urges his men forward one more time and crashes into William's knights. The French cause 4 damage but miraculously no losses. William's troops cause 2 damage which ends in 3 losses (poor cohesion check), along with a casualty check for the constable (cohesion die roll was a "6"). The constable escapes unscathed but retreats. William's knights pursue, catch the French, and fight another round of melee. William suffers 1 loss, but another cohesion roll of "6" for the French sees a total of 5 additional losses and the death of the constable.
End of turn 10 - Battle over

With the two best units on the French side lost in this turn, and the constable dead on the field of battle, the last vestiges of resistance crumble. William gathers his troops and continues his march to Cazalet and the rendezvous with Raymond.

Recap and Campaign Notes - This scenario did what I wanted it to do; it gave me an introduction to the rules. I can now reread certain sections of the rules and try to answer some of the questions I scribbled down as I played. Despite what ended up being, as expected, an easy win for William, there were some moments of potential future impact that could have turned on a die roll. Given that I am using this as part of a series of linked battles in a campaign, a bad cohesion die roll on any of a few different occasions could have gotten one of William's units beaten up pretty badly, and as we saw with the constable, it only takes one bad cohesion die roll to end a leader's career in an instant. As for the forces involved, there were no serious casualties, so there should be minimal impact to this contingent going forward.

I will post my thoughts on the Impetus rules themselves in a separate post.

Grace, who helped me push some figures around and was my designated dice roller for a few turns this morning, is already asking me when we will play the next scenario. I told her "soon Dear, soon"...

Impetus Campaign - Cazalet Part 1

Turn 1
Enemy - Wins the initiative and puts his impetuous Men at Arms and the crossbows on opportunity.
Friendly - Skirmishers and mercenary crossbows both take two moves and end disordered. Longbows move twice, end in good order, shoot at the enemy crossbows with one die and miss (4 die for VBU minus 2 for moves minus 1 for long range vs infantry).
Reinforcement roll fails (would have needed a 1).
End of turn 1

Turn 2
Enemy - Wins the initiative but nothing to do.
Friendly - Skirmishers fail to rally and make one move. Light infantry rallies and moves twice, disordering again. Longbows make one move and fire at the crossbows, rolling one damage but only disordering them. Mercenary crossbows rally and move once, firing but missing.
Reinforcement roll succeeds, so the heavy infantry will enter next turn.
End of turn 2

Turn 3
Enemy - Wins the initiative again. Crossbow fails to rally and so cannot go on opportunity. Nothing else to do.
Friendly - Heavy infantry makes three moves on the road and ends in good order. Skirmishers fail to rally again and move forward toward the stream. Longbows remain stationary and fire at the crossbows but miss. Mercenary crossbows move twice, wheeling and then moving ahead, ending in disorder. The light infantry fail to rally and only creep forward a few inches so as not to get in the way of the advancing reinforcements.
Reinforcement roll passes so William will arrive next turn at the head of his household Men at Arms.
The range advantage of the friendly longbows and mercenary crossbows compared to the regular enemy crossbows is substantial, but the friendly fire continues to have trouble hitting anything. We will continue to close the range.
The enemy sits and waits patiently.
End of turn 3

Turn 4
Enemy - Wins initiative, fails to rally the crossbows, who still don't have a target, as the nearest target is just outside of 15U (inches).
Friendly - Skirmisher rallies and moves one move to the edge of the stream (remember the stream is just decorative in this particular game). Mercenary crossbows fail to rally, shoot with 1 die and miss. Longbows move once ahead, and shoot at the heavy infantry ahead of them behind the hedge (at short range; 4 dice minus 1 for the move, total 3 dice). They miss. Again. Light infantry fails to rally and moves once to get to the right flank. The heavy infantry moves once up the road and then a second move to form up in place (I think I am making this rule up...but it needs it), ending in disorder. William and his Men at Arms move twice up the road and then a third move to form up, ending in good order.
The reinforcement roll is passed, meaning that the last unit, the heavy cavalry, will enter next turn.
End of turn 4

Turn 5
Friendly - William wins the initiative for a change and surges forward. The skirmishers sidestep one move to give the following troops more room. Longbows move one move oblique to the left front, automatically disordering. They shoot at short range with only one die (4 minus 1 for move, minus 1 for disorder, and giving a minus 1 for the hedge). The roll a hit to get a damage, but the target heavy infantry passes its cohesion test (but therefore does end disordered). Crossbows fail to rally, move ahead into short range of the enemy crossbows, and shoot but miss. Light infantry fails to rally but moves once toward the right flank. The heavy infantry rally, move twice forward and end in disorder. William and his knights move twice and end in good order. The newly arriving heavy cavalry move twice up the road and then a third move to form up, ending in good order.
Enemy - Heavy infantry and crossbows both fail to rally. The crossbows have a target now and shoot 2 dice (3 minus 1 for disorder) at the mercenary crossbows and miss. The constable and his men at arms stay on opportunity to keep from having to act on their impetuousness.
End of turn 5

After 5 turns of almost no action, I am satisfied with the exercise so far. I have been able to fumble through a few turns of basics; initiative and turn sequence, command, movement, disorder, rallying, and firing. This is exactly why I set this scenario up the way I did. Things should get much more interesting very soon though, as we have missile troops within short range, formed troops fairly close to each other, and the command issues for the good guys straightened out with the arrival of William. Next order of business will be to get the good guys deployed so they can get stuck in...

...to be Continued